Tarps are an enormously useful item for creating or roofing a shelter. Alone they work great and with with few accessories even better.
Not only does a tarp protect against rain and snow, it also gets you out of the sun on a hot day, out of the wind on a windy day, and acts as a barrier to frost and condensation. I’ve learned from experience about the latter (which is also why I often have an MSS bivy with, but that’s another story).
It can be tempting to skip the tarp (or tent) and sleep in just a bag with a clear view of the stars above you. What you might not expect is waking up with your bag damp to soaked from condensation. As temperatures drop and humidity drops out of the air, the bulk of it will condense on the final layer of your set up. This is where that extra layer between you and the air around you comes into play, it gets wet and your sleeping bag remains dry (relatively). This isn’t always an issue but it’s a very annoying one when it is.
Many people might not know this but another name for Box Elder trees is Ash-leaf Maple, and they are in fact a type of maple tree. What most people do know is that maple trees produce delicious syrup. Put those two facts together and you might wonder what does Boxelder (maple) syrup taste like? Delicious.
Before I knew the answer to that question, I wondered the same thing. So when spring came here in North Dakota, I set out to find some suitable trees to tap. I was looking for any healthy looking boxelder a foot in diameter or bigger. Which leads me to my first lesson..
How to Correctly Identify a Boxelder
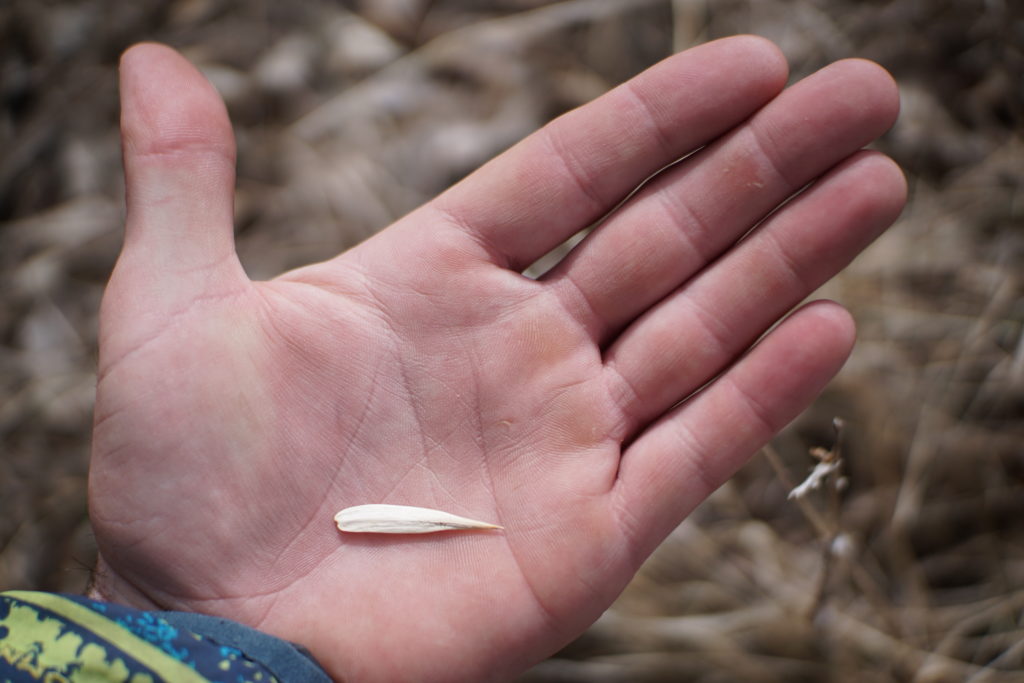
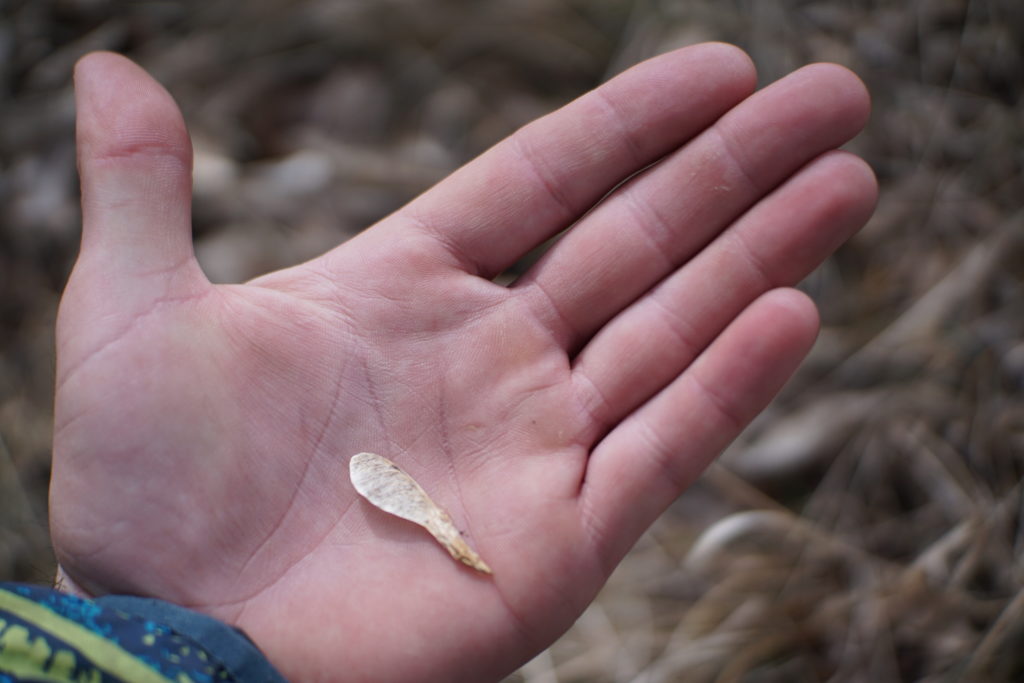
This was a tough one for me. Our valley is filled with mostly Ash and boxelder trees, which I have a difficult time differentiating sometimes. To know for sure what I was looking at, I looked for trees with seed on them. Both ash and maple have “helicopter” seeds, known as samara, but there are notable differences.
Ash seeds are semi-symmetrical with 2 wings emanating from the center.
Box elder seeds are asymmetrical with a single wing emanating from one side.
Once you know you have box elder, it’s just a matter of waiting for the right time. As spring rolls around and temperatures rise above freezing during the day, the trees begin thawing and all the sugary sap they stored over the winter starts flowing. It’s a pressure change caused by the thawing of the tree that drives the sugary sap up from it’s roots and through it’s tissue as the tree comes back to life. To collect this sap as it travels through the tree you simply drill a hole and tap into this.
Tapping the Tree
The information I found on procedure varies but I’m sticking within the guidelines stated by Minnesota DNR (Department of Natural Resources). I think it’s safe to assume their information would be somewhat “official”.
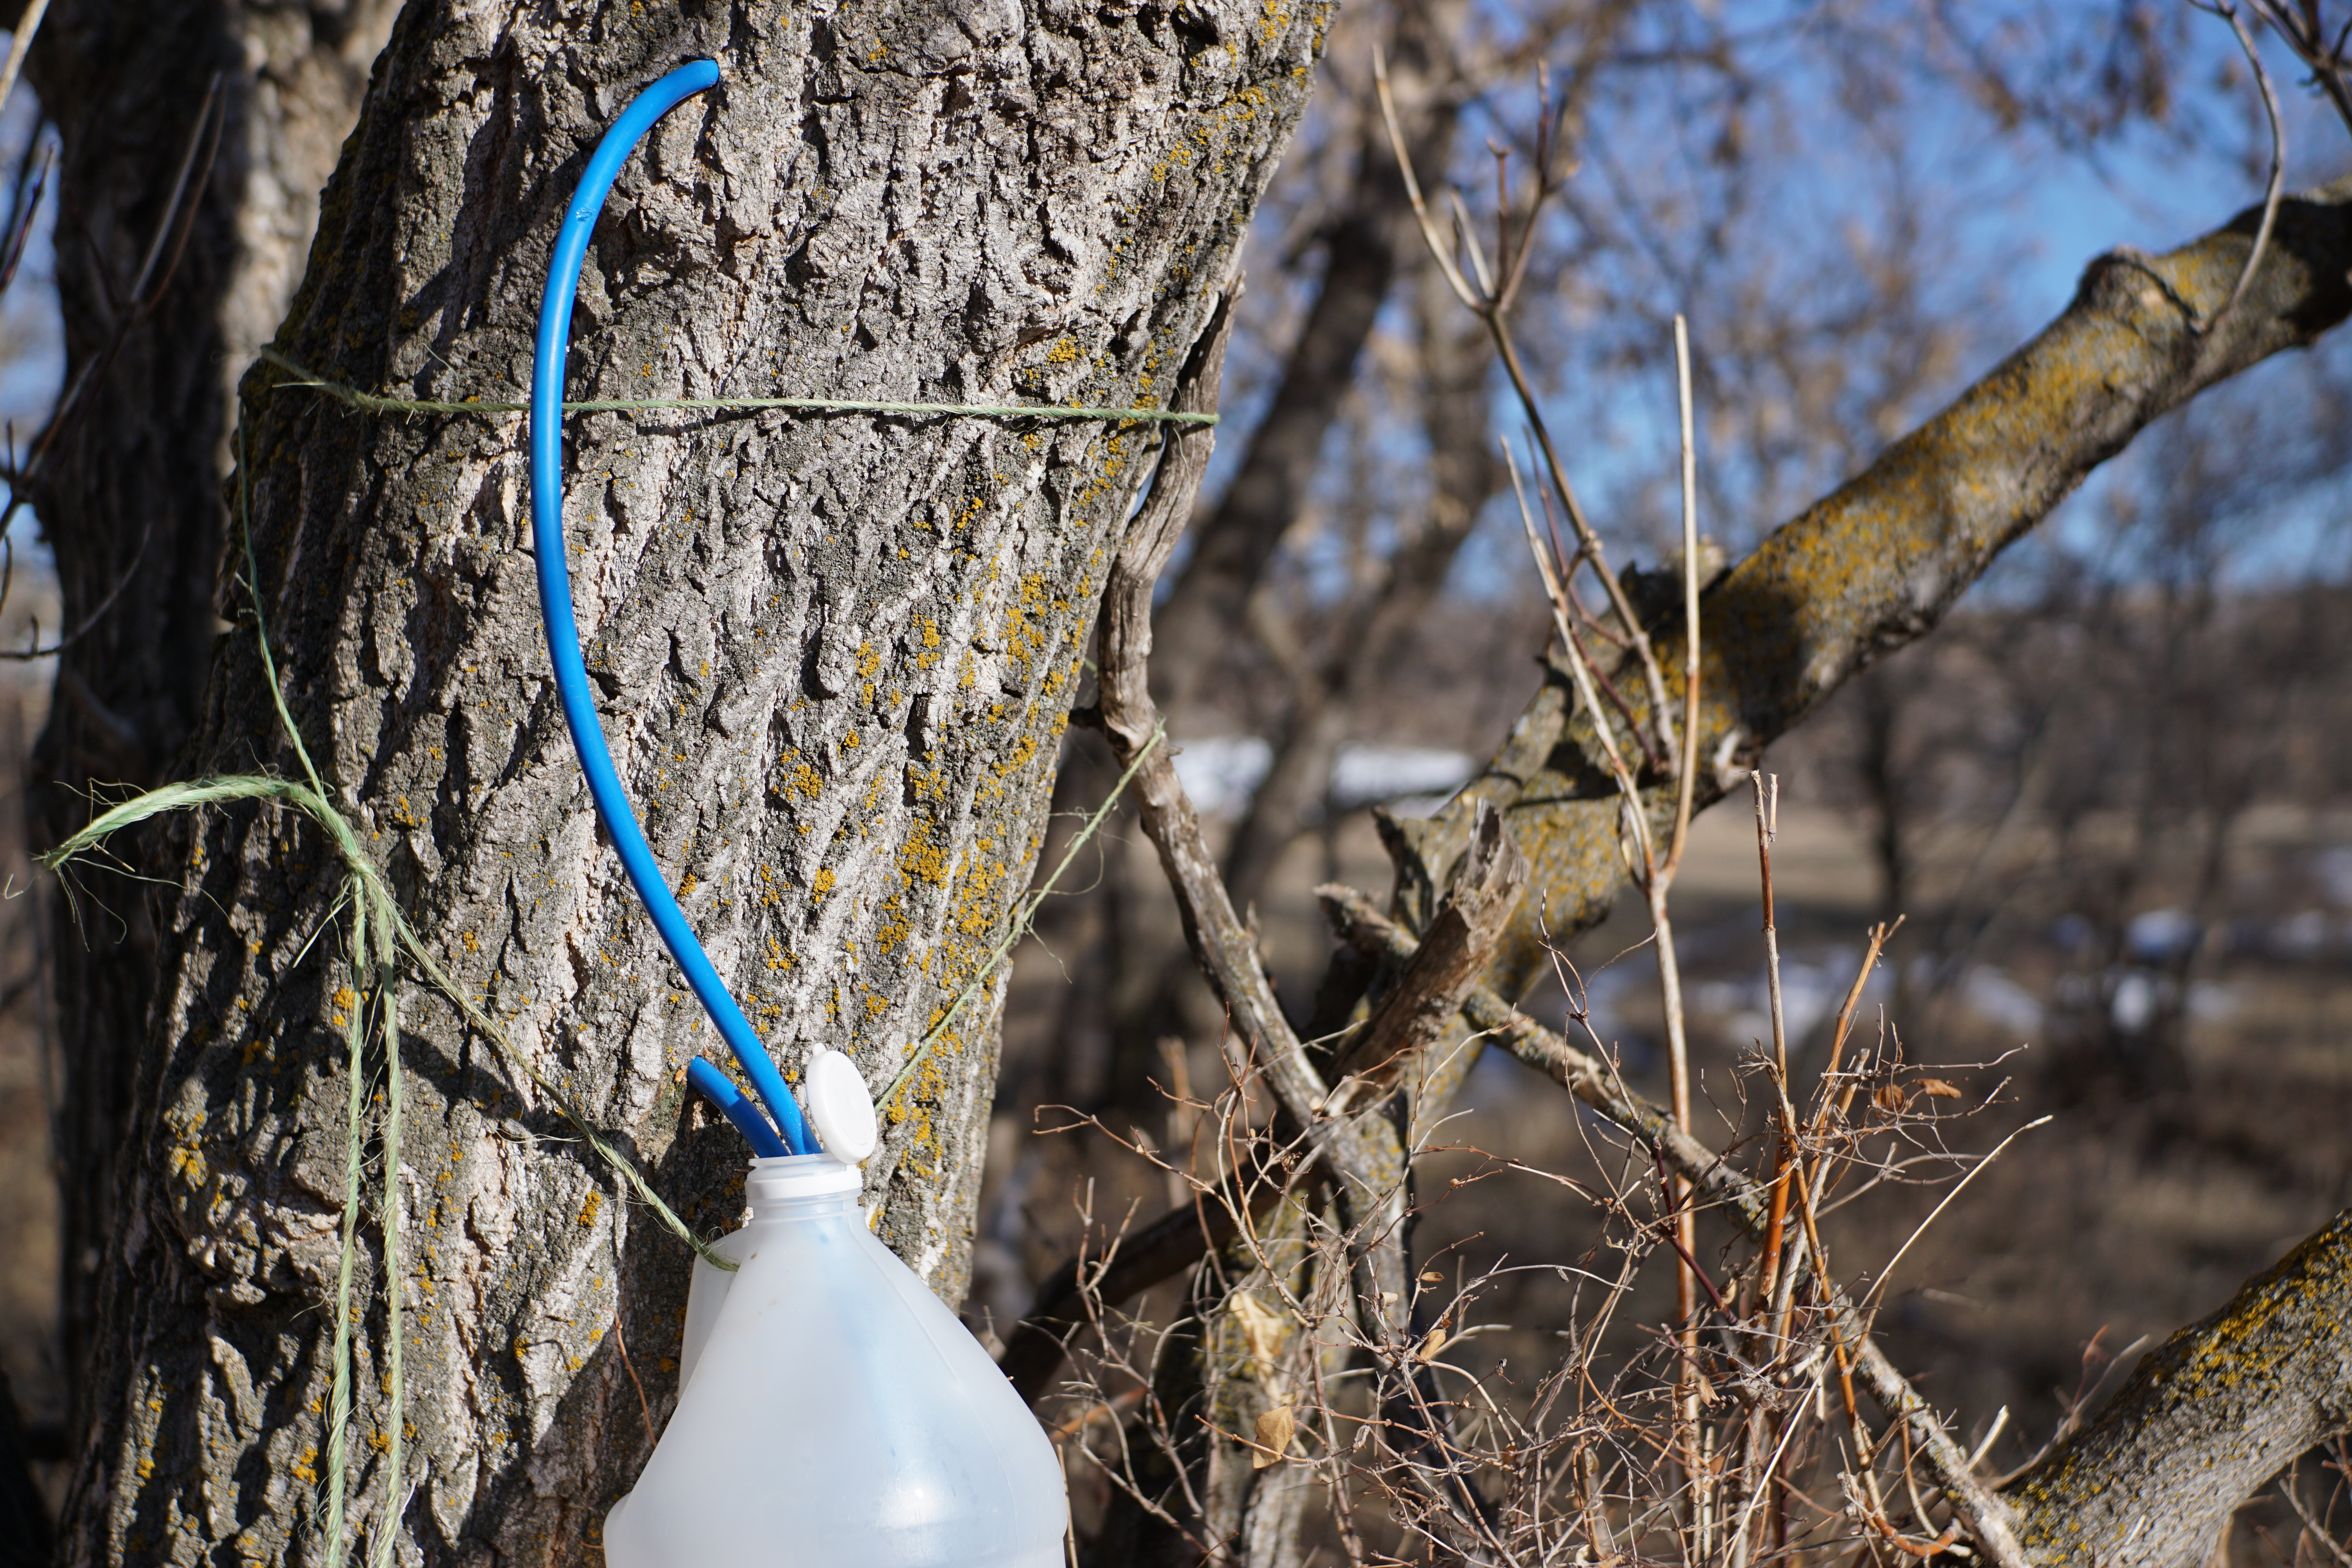
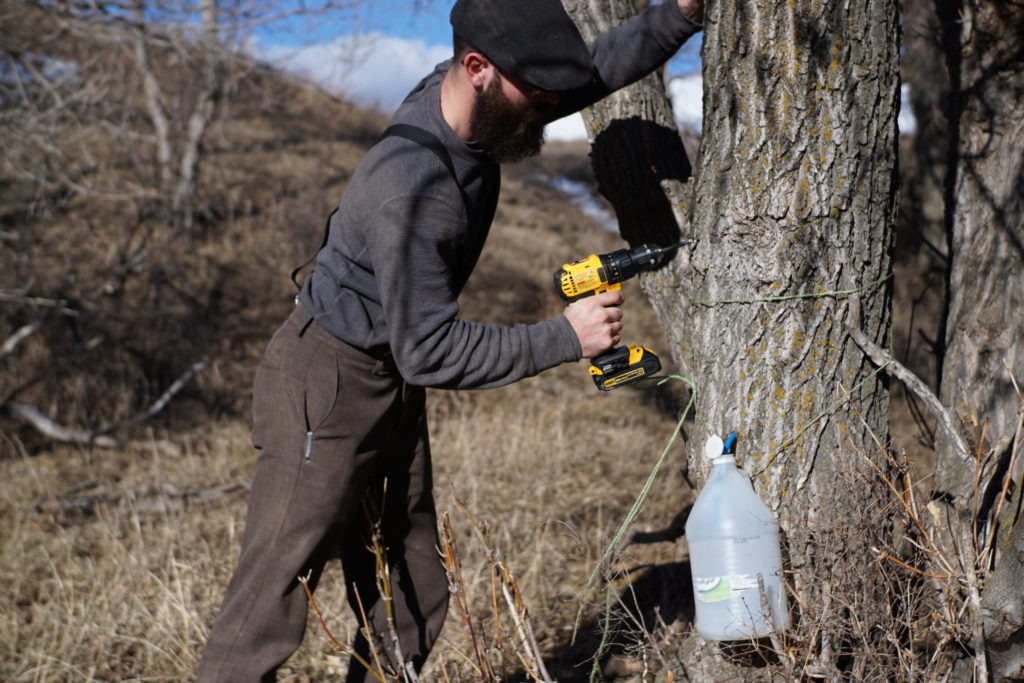
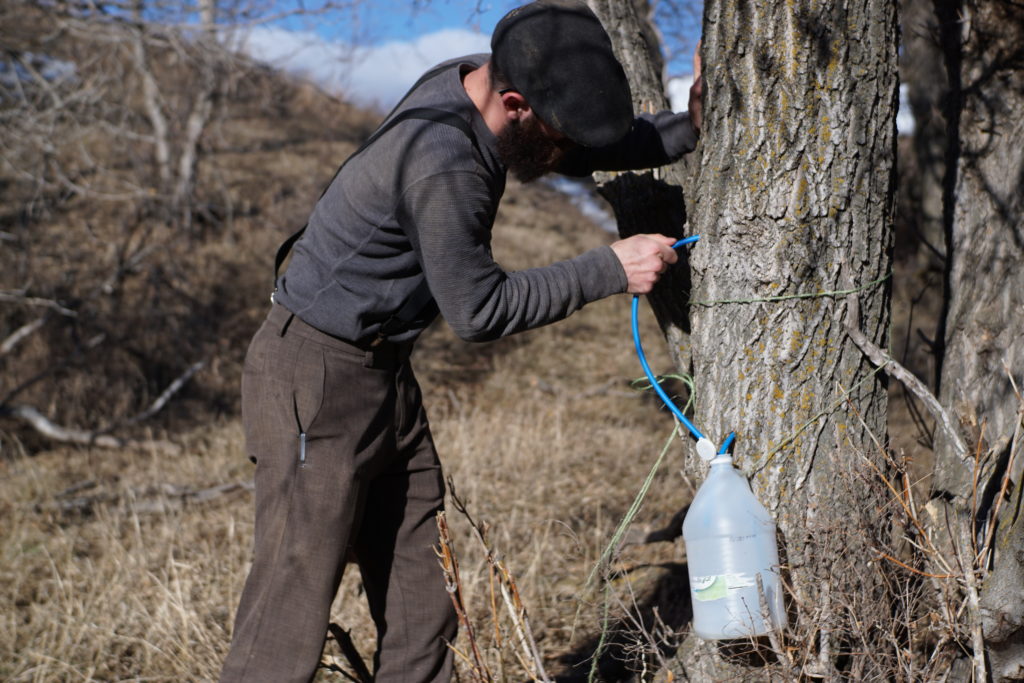
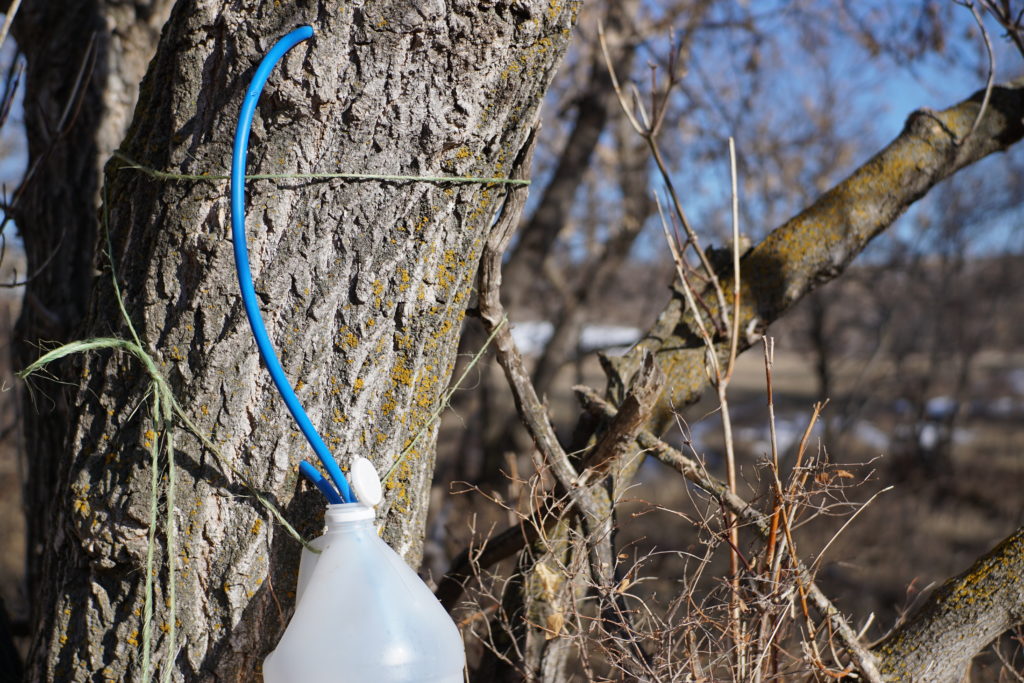
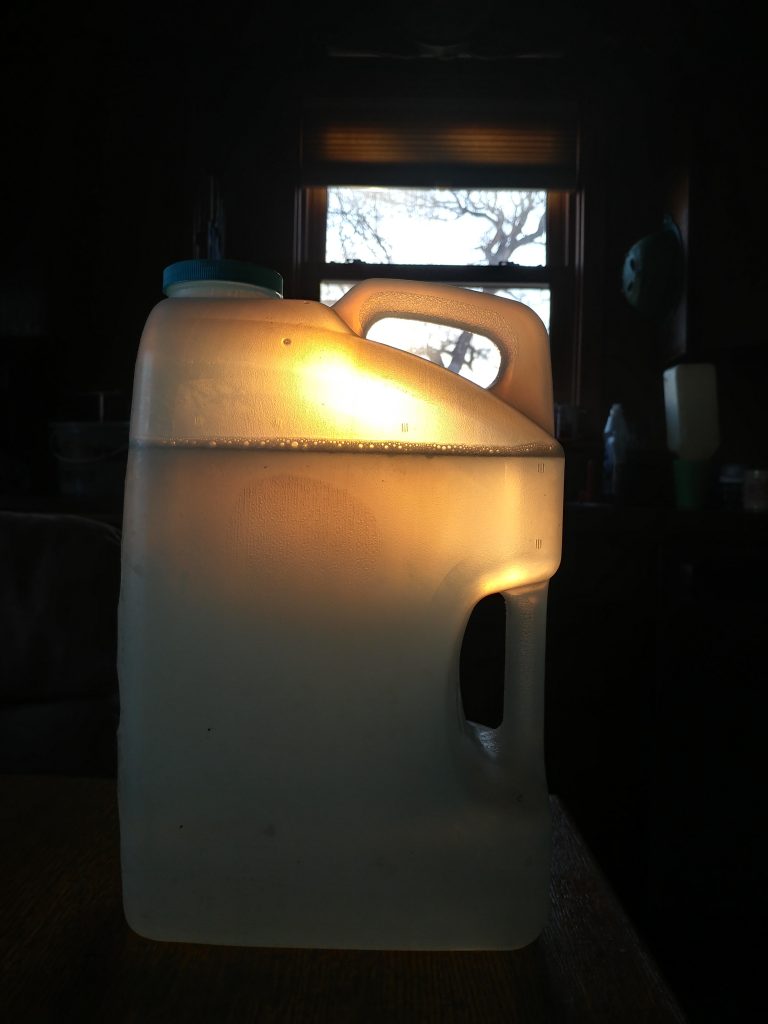
Here I’ll go through the process of how I added a second tap to this tree and into one of many old vinegar jugs lying around, which already had a tap going into it. I had simply used a scrap piece of twine (which we also have plenty of on the farm) and strung it through the handle then wrapped it around the tree before tying it off with a slipped knot.
Trees are resilient but it’s still a good idea to have clean equipment. Especially when tapping multiple trees, I suggest sanitizing your bit between trees to avoid spreading disease or infection that might not be apparent.
I started by finding a suitable sun facing section about 2-4 feet up from the base and drilling a hole with my 5/16 inch bit, making sure it had a slight upward angle for better drainage and went no deeper than 3 inches. I also didn’t want to crowd the tap I already had in this tree
After cutting the correct length of semi-rigid 3/8 inch tubing, I guided the sap to my container by inserting one end of the tubing about a half inch into the 5/16 inch hole I drilled, enough that it was snug and didn’t leak.
Before I was done I double checked everything was at least somewhat secure, and that the container wouldn’t sag below the tubing as it filled up by pulling down on it.
Later I upgraded my setup by guiding the tubes to a six gallon water container I just set on the ground (Sorry, I didn’t get any pictures of this). That way I didn’t have to check the containers as often; which wasn’t an issue right away since I was so curious every time anyway.
My best producers were the trees that got sun throughout the day, the warm sunlight helps drive the sap up from the roots. The same concept held true for different taps on the same tree, taps on the sun facing side always produced more sap.
I collected, on average, around 1/2 gallon per tap per day. This number can vary wildly, based on a number of factors such as time of season, location, and how cold the nights get or how warm the days get. Personally, with 13 taps I collected a total of about 6 gallons of sap a day when the freezing/thawing conditions were met. I’ll go over this more later but that meant I got over a pint and a half of syrup a day from my 13 taps when sap was flowing well.
Making Sap into Syrup
Yes you can just boil the sap down until it seems like syrup, but there’s a few things about the process that are nice to know.
Most maple syrup comes from a specific maple, the sugar maple. This is because it has the highest sugar content (hence the name); it takes about 40 gallons of sugar maple sap to make 1 gallon of syrup. With box elder (ash-leaf maple) it takes about 60 gallons to produce 1 gallon of syrup. This can vary from tree to tree and location to location, but that’s the ratio I often read and what I personally experienced.
This can be done any number of ways but it’s worth keeping in mind the amount of moisture it will introduce into the air, so indoors is probably not where you want to do this unless it’s well vented. I was tempted to use my aluminum turkey cooking pot and burner, but since your concentrating the liquid and ingesting it, it’s probably best to avoid aluminum and stick with a good inert metal like stainless steel. My method consisted of finding every good sized stainless steel pot we had on the farm to set them on whatever heat source I was likely to be around through the day.
The process of boiling sap is not a short one. Because sugar content can vary so often, It also requires pretty constant attention towards the latter half. With a setup specific to sugaring this probably isn’t true but I was working with what I had on the farm. I might build myself a large open top wood-burning barrel stove boiler in the future but for now it’s three boiling pots sitting on top of propane burners.
Back to that attention part! Boiling water with high sugar content can go horribly wrong. The last thing you want to do is accidentally burn the sweet sugar that took so very long to concentrate! When the whole process takes days sometimes, it can be easy to loose track of how much sugar content you actually have or water you’ve boiled off. This is where a thermometer comes in.
It’s pretty universal knowledge that water boils at 212 degrees Fahrenheit or 100 degrees Celsius. What might be less common knowledge is the fact that these numbers can change significantly depending on altitude or weather conditions. Altitude, and air pressure, have the greatest effect on this. At sea level, water is much closer to boiling at the standard 212. As you rise from sea level, the air pressure drops and with it the temperature water boils at. With all this in mind, always check what temperature your sap begins boiling at and take note. This is useful later, as a baseline to compare with.
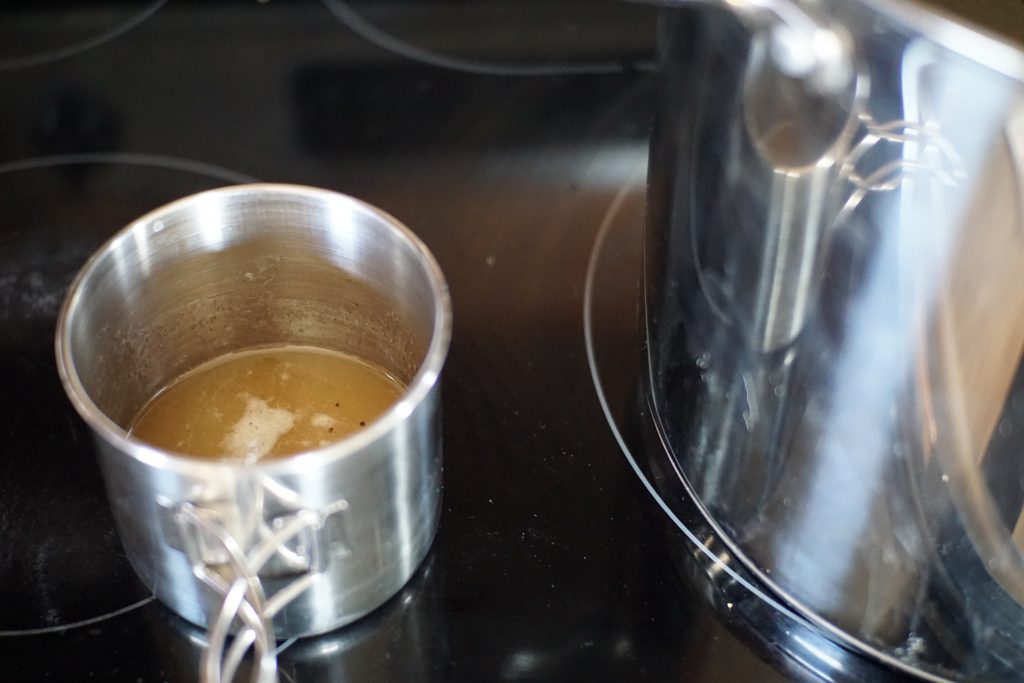
My first batch of Syrup, just enough for a few pancakes.
As sugar content (and other various tree blood components) increases, the boiling point of your sap will also rise. If you pay close attention to this change (or lack thereof in the beginning) , it will give a very good idea of where you’re at in the process. When it reaches a boiling temperature about 12 degrees F higher than your baseline, your sap has become ideal syrup. That means it has a high enough sugar content, and therefore low enough available water content, to prevent spoilage.
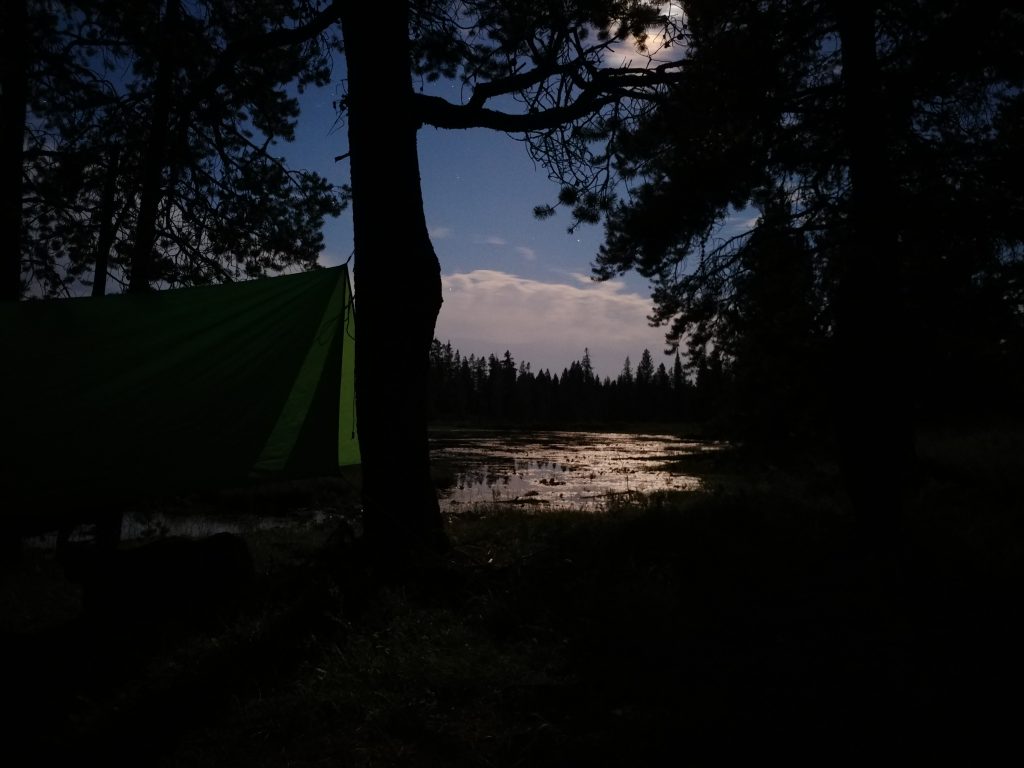
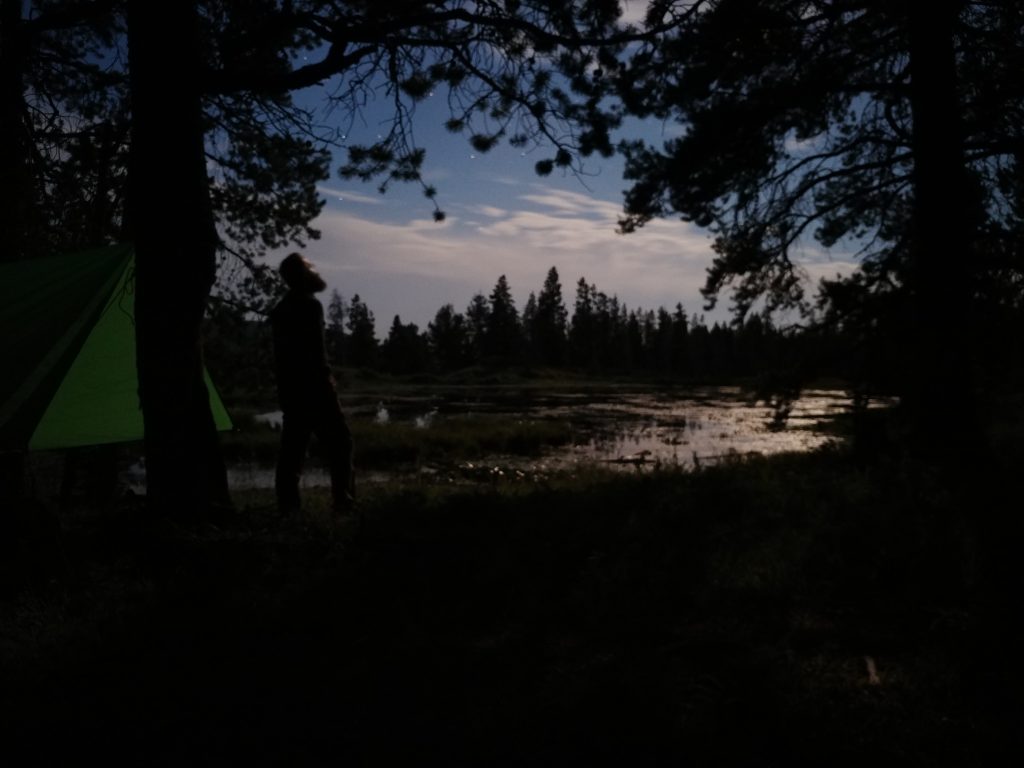
As I’ve spent more and more time outdoors, I’ve come to realize how much I appreciate the moon {natural light, fires, etc..}. Artificial light has a certain unappealing aspect when in nature. When your eyes adjust to a powerful beam of light, your vision becomes restricted to only that area. You might be seeing a small area in greater detail but you can’t see the bigger picture. Conversely if you let your eyes adjust to the natural light, you’ll see all around you. It’s amazing what the eye’s can make out with just a little bit of contrast. This is especially true in the winter when the ground is blanketed in white snow. It’s one of the many reasons us humans have managed to survive for so long.
The stars alone make it worth turning off the flashlight. There’s not many things as awe-inspiring as looking up and seeing the stars once your eyes have adjusted properly, especially on a trail away from light pollution. With that said, I always have a light source on me. Sometimes you just need to better see what you’re looking at. I enjoy seeing the forest for a forest, but sometimes you need to see it’s trees.
A lot of very friendly critters love night time too; here a beaver with a plan added to the beautiful soundscape. I might not have been able to see much of him but without sound pollution I could hear even the smallest splash of water. I could see the moon reflecting off ripples of water as he swam by and make out silhouettes of lily pads floating on the surface.
In the distance I could see moonlight bouncing off snow capped peaks and the silhouettes of the enormous mountains looming over me.
I just wish my tarp was clear.. maybe I’ll have a post about how I make one later.
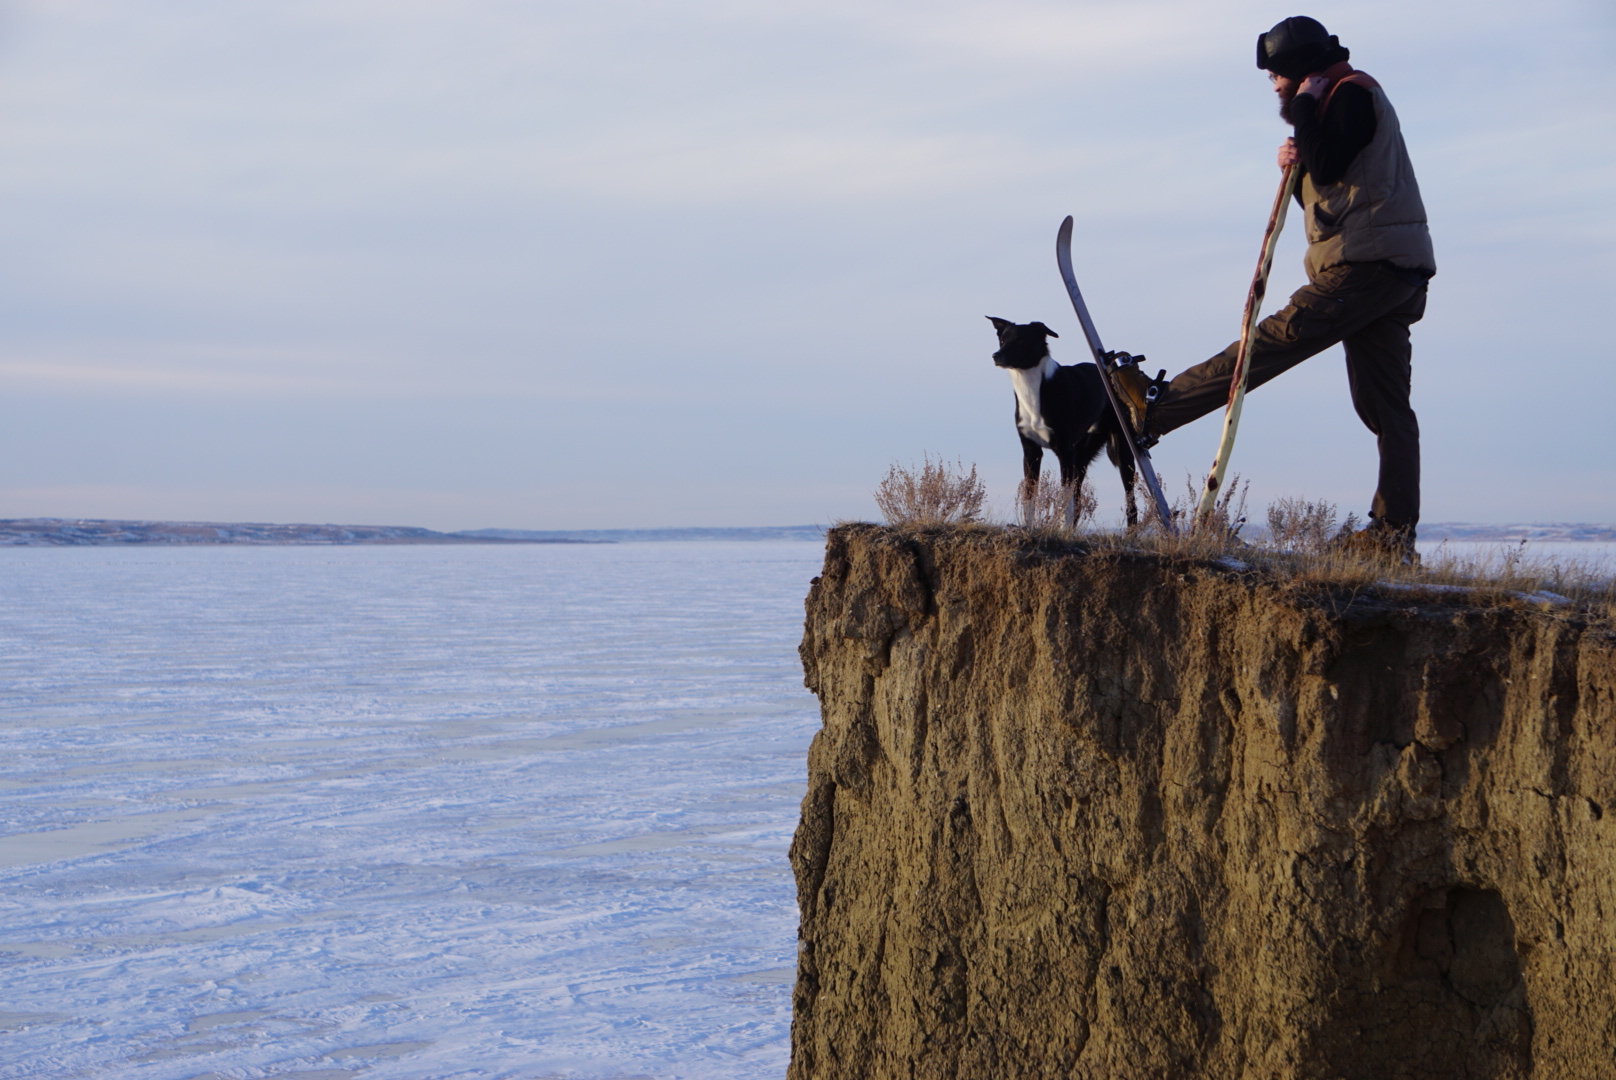
It was about a week after my birthday and a week before Christmas. Snow was on the ground and it was around the time you might find me hundreds of miles away snowboarding in some distant mountains like I do every year but this year two sets of skis were on their way to my front door. One for myself and another for my brother, to compliment the skis we’d gotten for his kids a few weeks earlier.
Why Skis?
I love everything about snowboarding but snowboards go downhill not up. Skis on the other hand give you some options for that up part.
Here in North Dakota we aren’t blessed with a whole lot of vertical, most of it having been an ancient seabed before being ground flat by enormous sheets of ice for thousands of years. This means the few ski resorts we have are small and hardly worth the drive. Still, the Missouri River and it’s tributaries managed to cut some beautiful breaks in the years since the glacial melt water first started carving them. It’s in these breaks where my great-great-grandfather homesteaded in 1906 and where I live today.
Which skis?
It’s dry here, and the only place you’ll find trees is in and around those carved out draws, where moisture gathers and springs form. Grass and brush fill in the rest.
It’s also cold here in the winter, really cold. Every winter has it’s own attitude but you can usually count of there being snow on the ground from fall to spring. Unfortunately it’s also relatively dry and very windy here. Snowfall can be sporadic, with a lot of drifting on the rolling treeless prairie in between. Essentially this means the snow has a good chance of being in poor condition with patches of grass and brush sticking through. Still, it’s snow and it’s here. I thought with the right skis, I could enjoy that snow even more.
With that in mind I searched for the best skis to meet my needs and settle on Altai Hoks. Which many call a ‘skishoe’, a cross between a ski and a snowshoe. They’re short for easy navigating, but wide for flotation. Best of all they have bindings similar to snowshoes allowing you to strap in just about any boot or shoe. This way you only need to pack the skis without worrying about the boots.
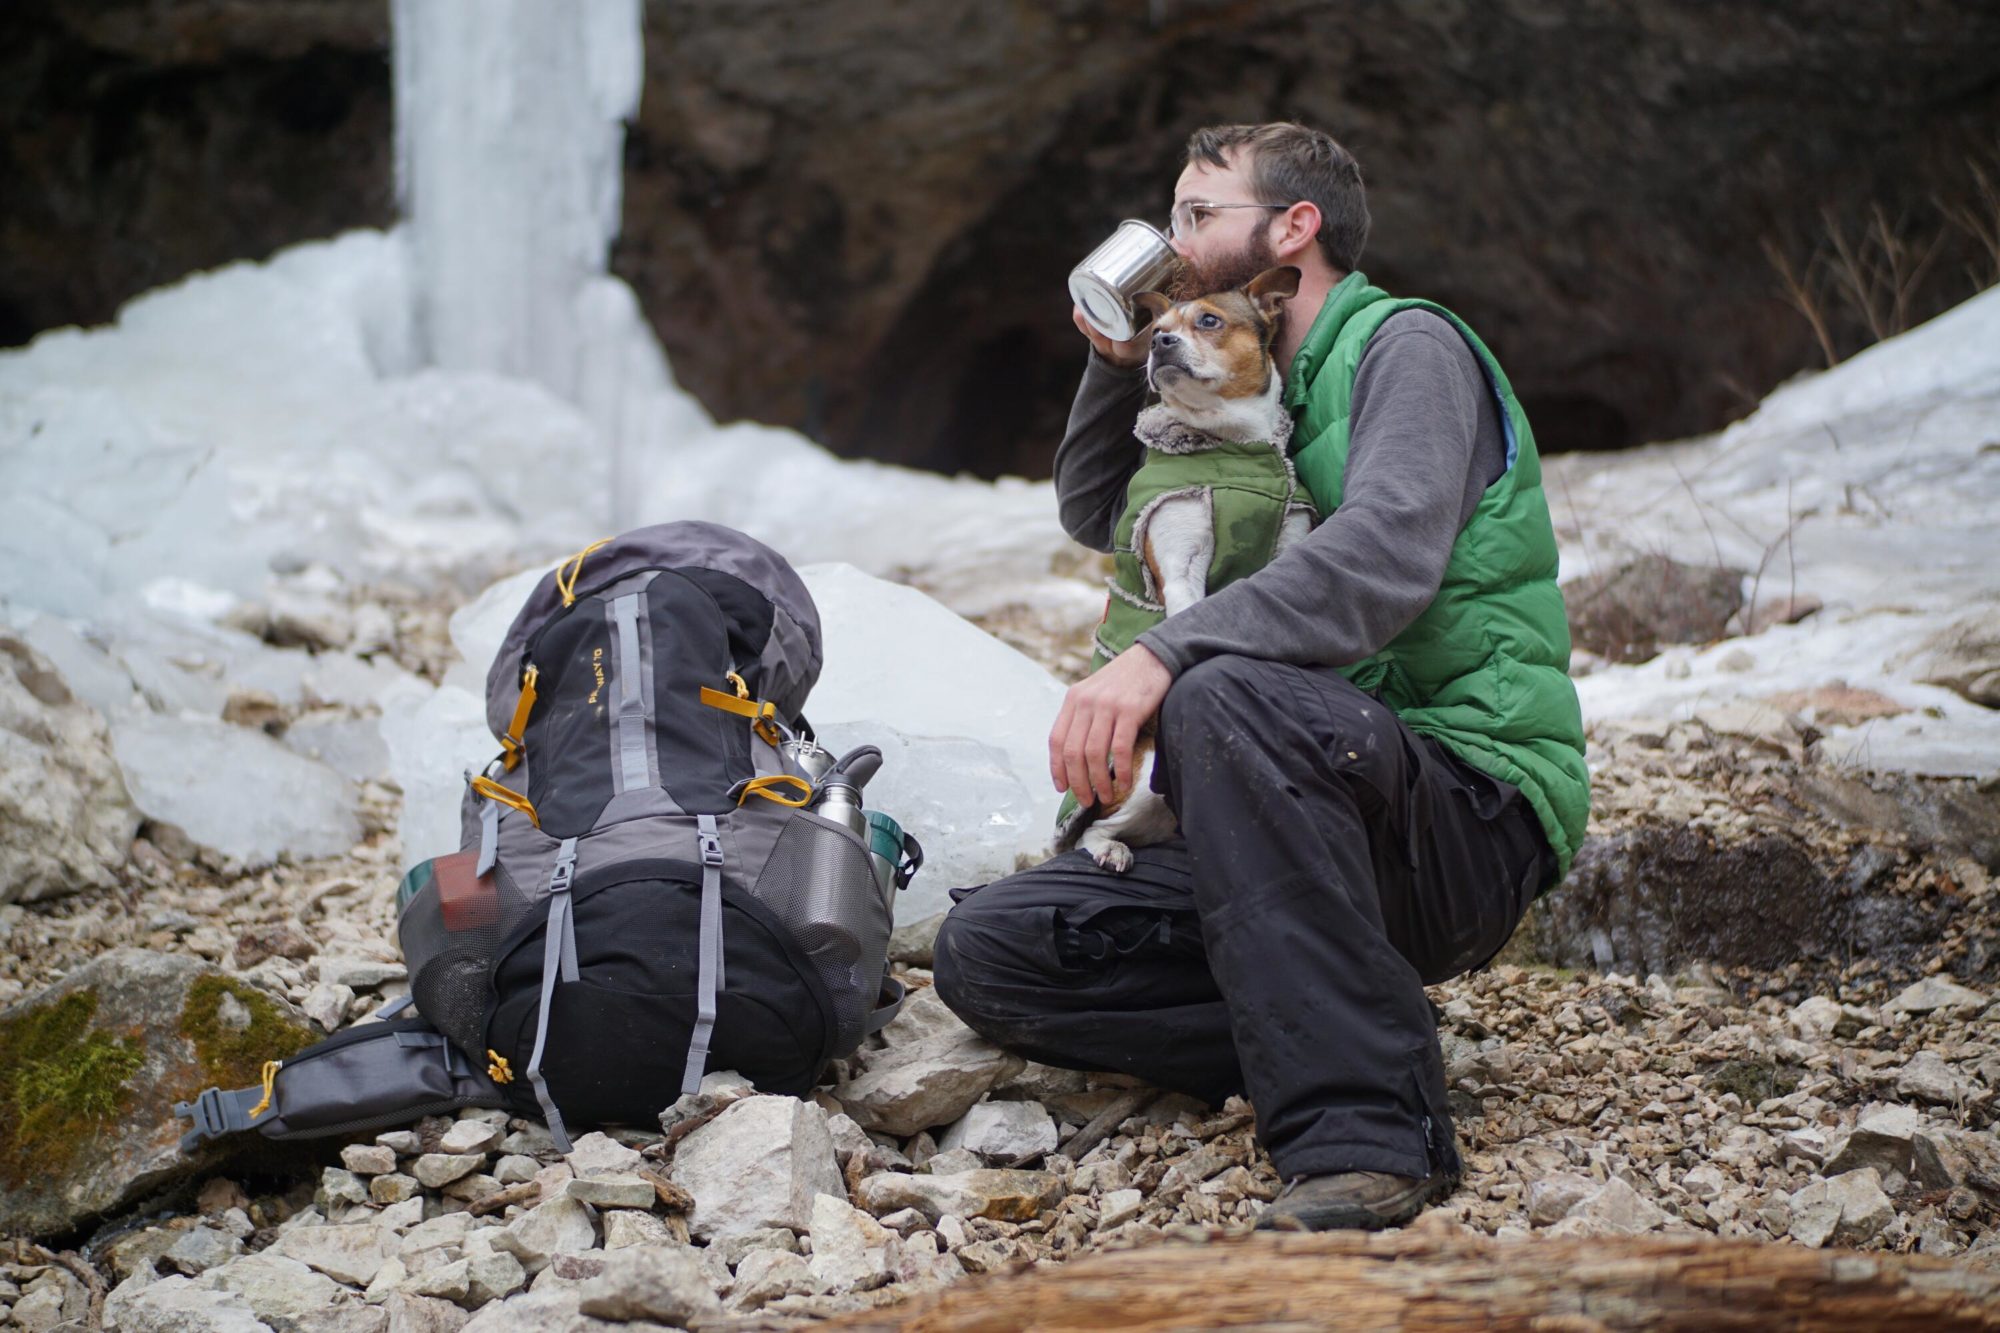
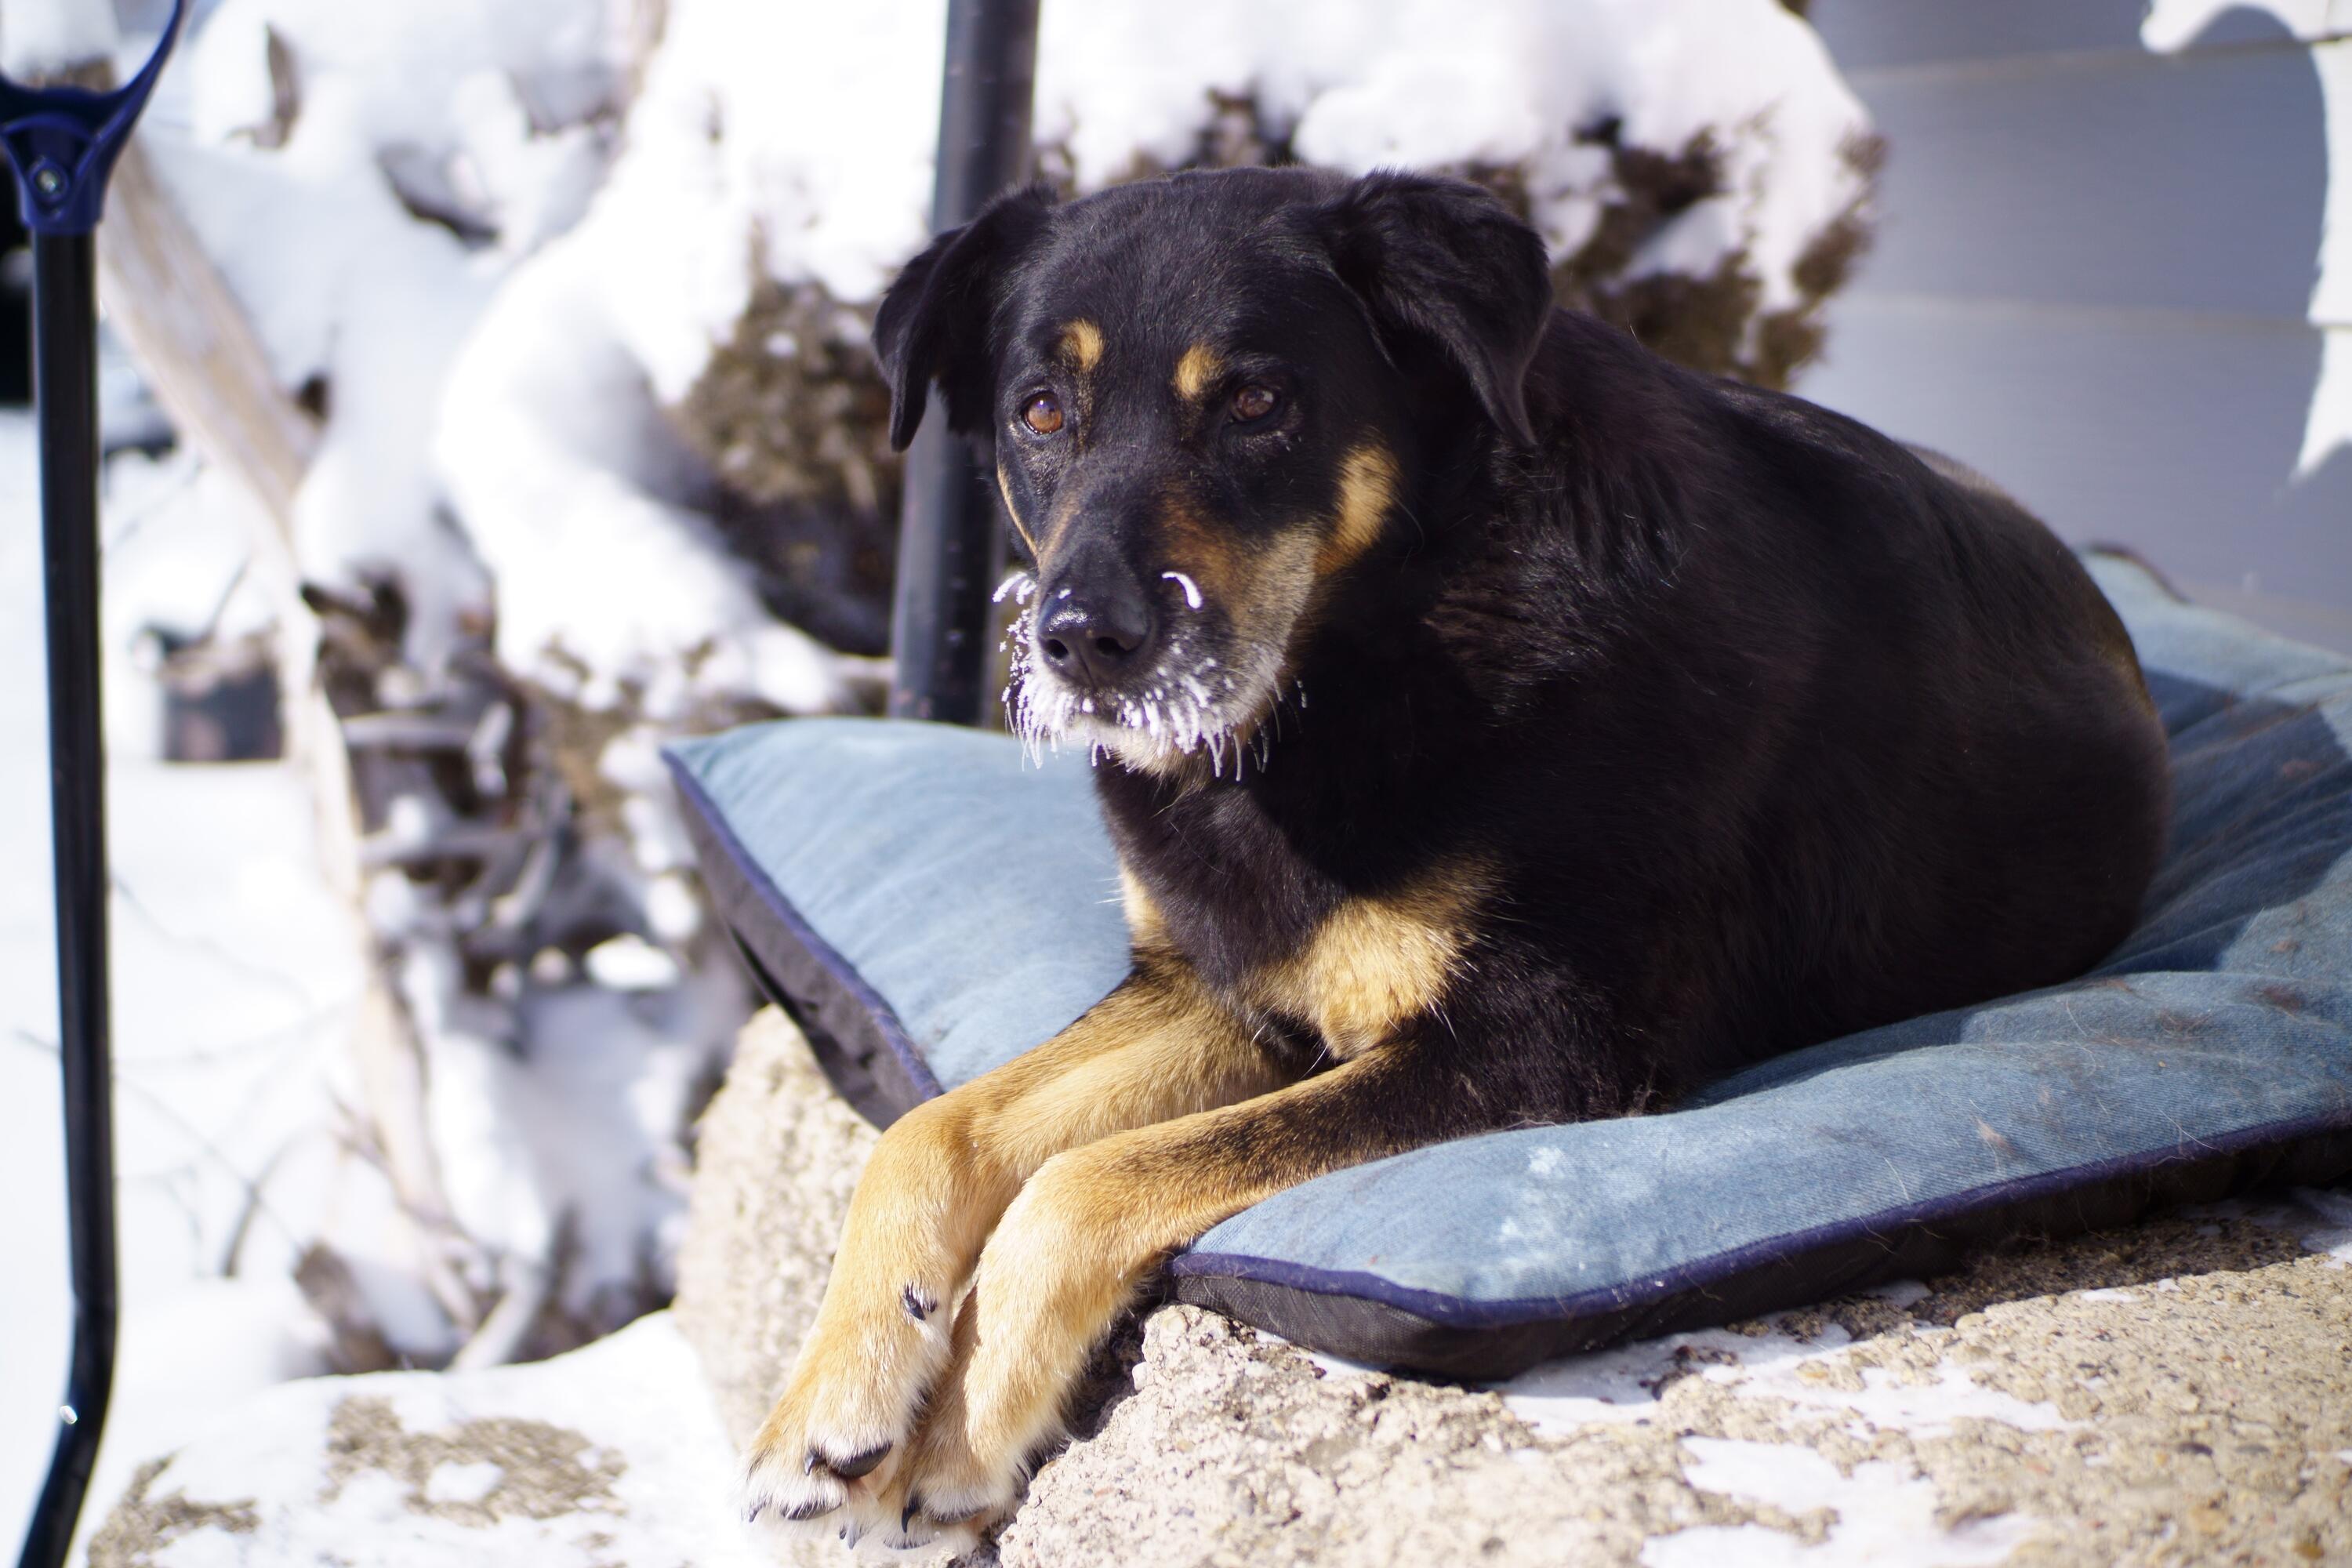
It’s easy to take for granted just how special our bond is with our four legged friends. Our close relationship with dogs goes back farther than any other known animal, with some evidence pointing to over 30,000 years. How far exactly is still a mystery and may always be but it was long before civilizations rose or nations were born, before humans had even figured out how to write languages.
When humans spread across the remaining continents they didn’t do it alone. They did it with an entirely different species by their side; Dogs. Whatever nationality, race, or color you are, I can almost guarantee one of your ancestors had a dog. When humans first set foot on Australia some 50 kya (thousand years ago), and North America some 15 to 30 kya, they had dogs.
Here in North America, proof of this lies in an unlikely candidate, the Chihuahua. When Europeans began arriving here en masse, Dogs were already well established here. In fact it was the Native Americans work horse before they had work horses. Chihuahuas and few other dogs that remain to this day still contain remnants of these Native American dogs.
With the ease of DNA sequencing today, not only is our own story growing; the story of the dog is more complex than ever.
Our shared roots
When we first befriended them, us and dogs had a lot in common. We were both hunter-gatherers, Predators; Our brains and social networks put us at the top of the food chain. I like to think it all started when a mutual respect formed. These early “dogs” were likely still very wolf like, but as human settlements began to change, so did these “domesticated” wolves.
The world was changing and us humans had an idea; why not herd some of our prey and keep them close by, so we would always have a meat source available. How coincidental is it that both us and Canines love herding prey?
Wolf to Dog
With the domestication of our prey well on it’s way, humans were also developing another fantastic food source; Agriculture. This is where “dogs” started diverging drastically from their wolf ancestors.
With more substantial grains, fruit and veggies in hand, The human diet was amidst a drastic change all over the world but we didn’t leave our canine friends behind. So too did their diet change, so much so it’s the most marked difference between wolf and dog.
A dog that could eat human food was likely to stick around camp, They also likely lived longer and bred more than those who couldn’t. That’s a lot of selective pressure to become the dog that we all know and love. One that can lick our plates clean and pick through our garbage.
Their usefulness only continued to grow.
Hunting Dogs (hounds)
Guard Dogs
Loyalty (Royalty)
Ever heard of the band Three Dog Night? ‘Three dog night’ is a term from Australia for a night so cold it takes three dogs to keep you warm.
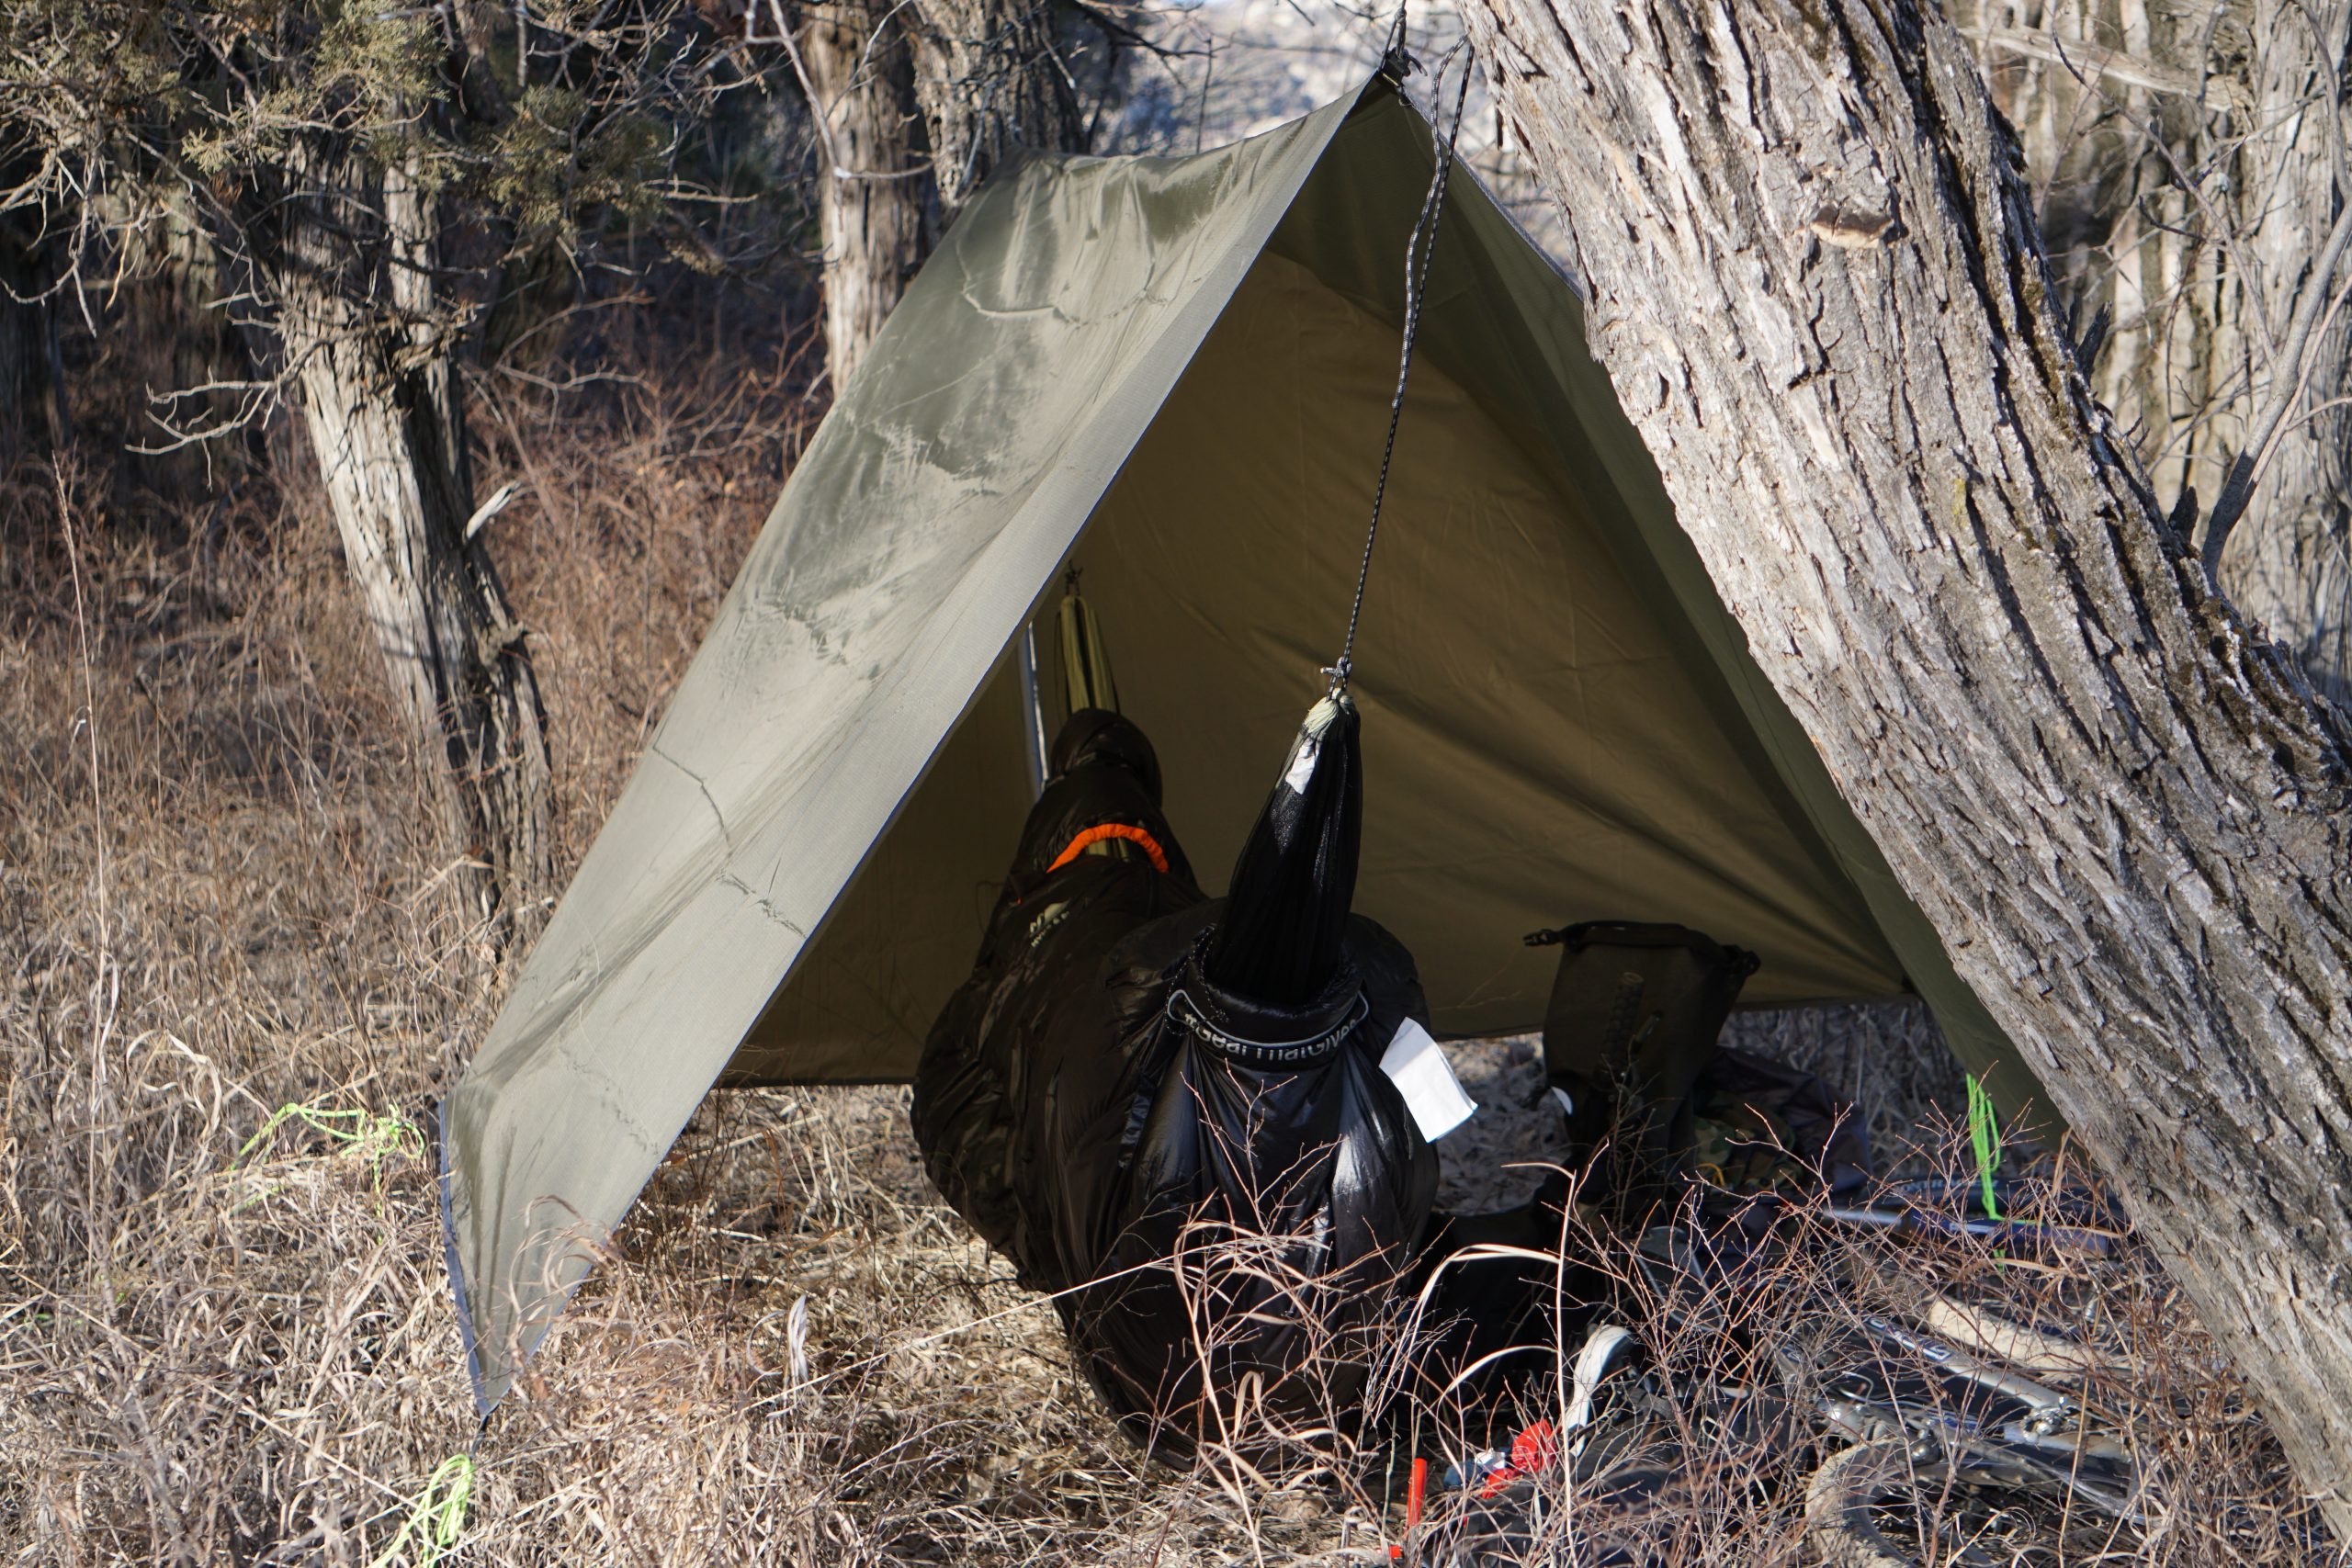
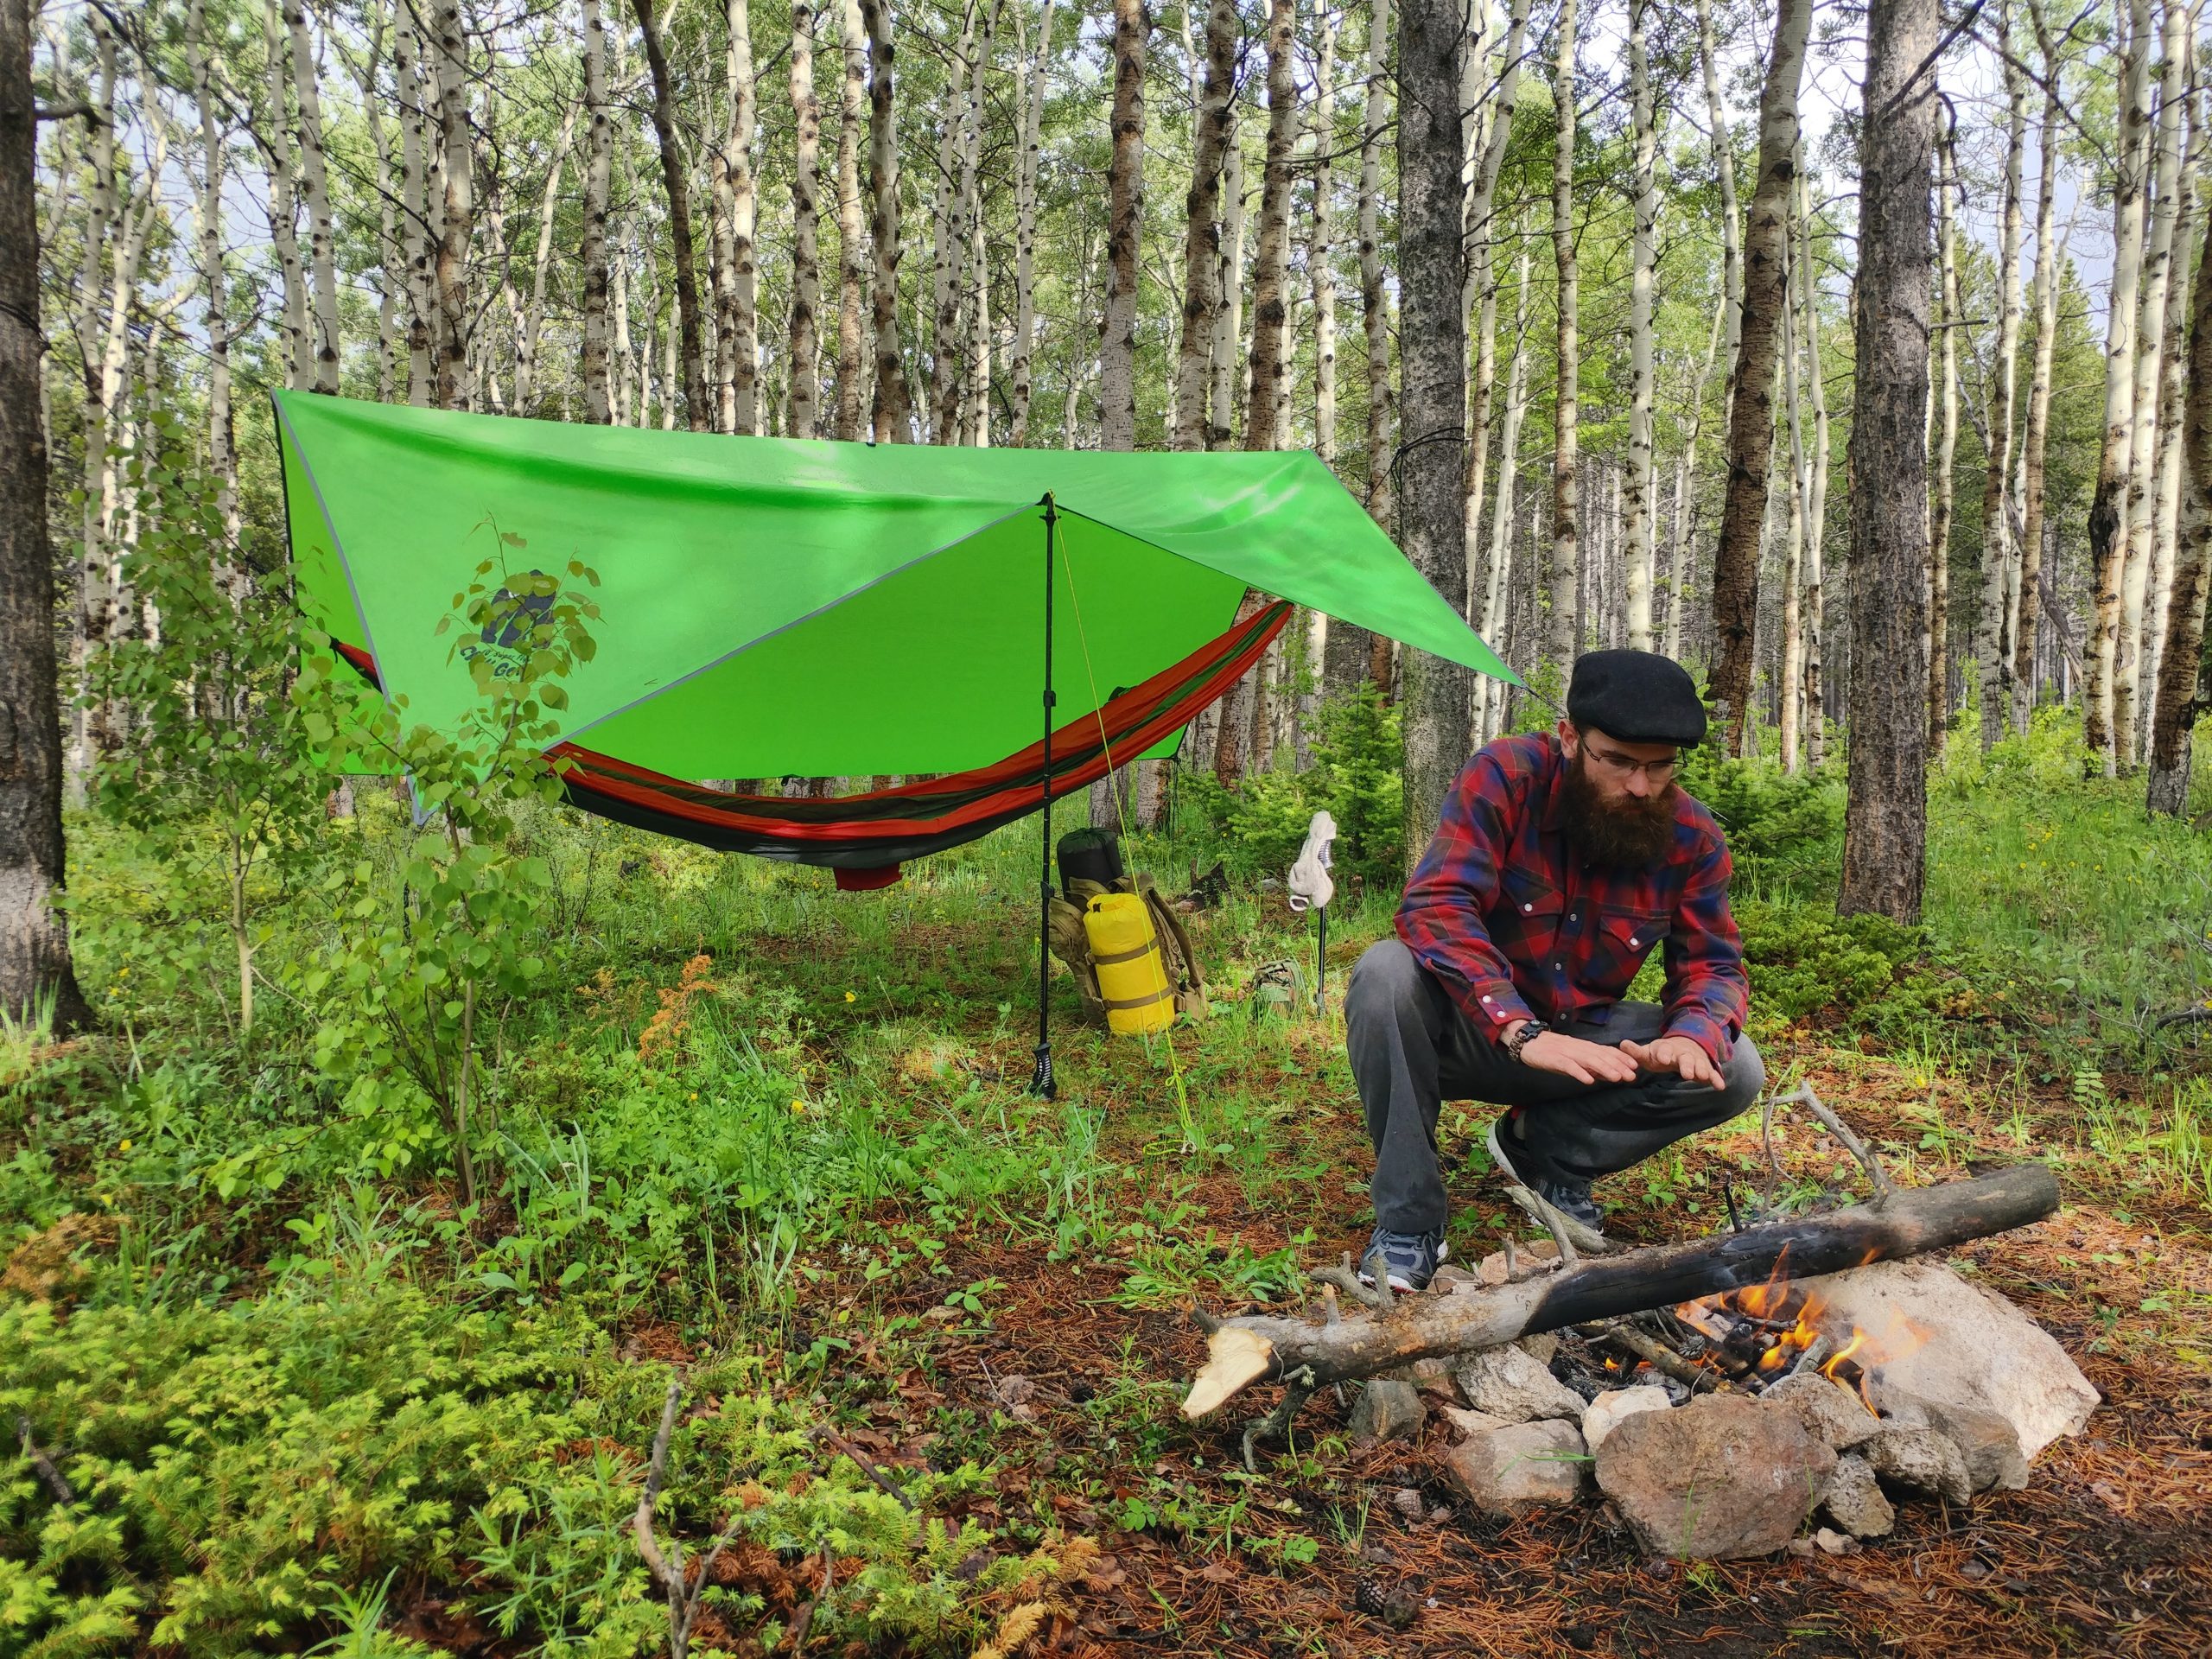
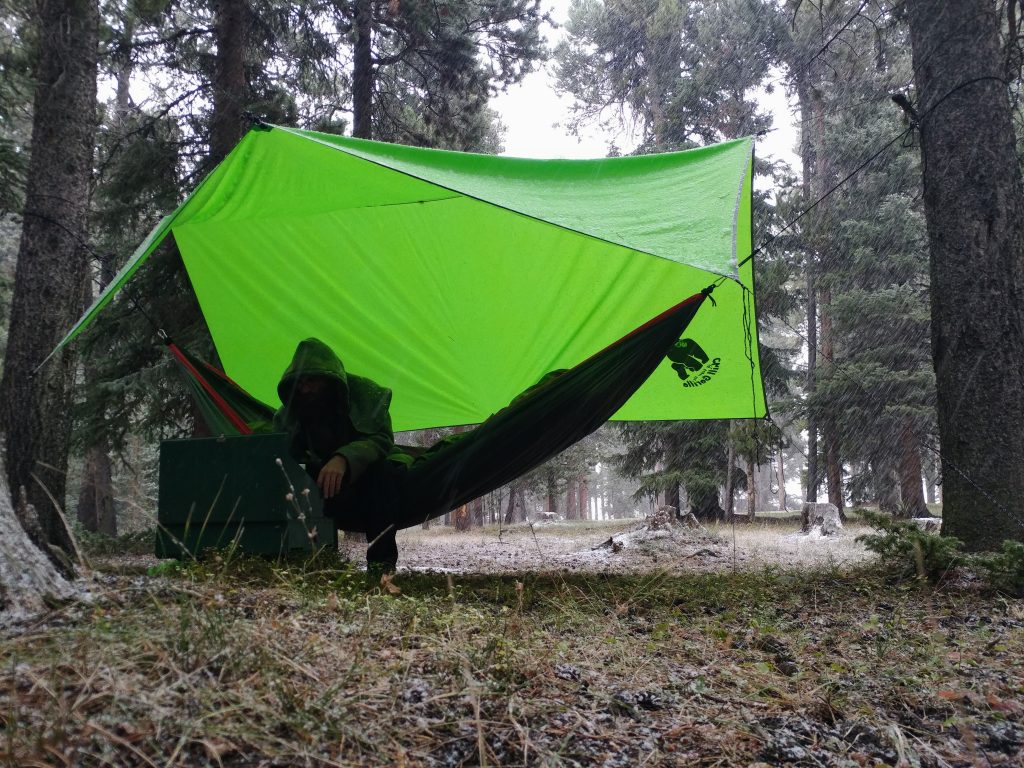
Or more specifically a hammock and tarp, but more on that in my other post on Sleeping under a Tarp. When ground camping, a tarp is just one of the many options for shelter. When it comes to hammocks, a tarp (or “fly”) is basically the only option for shelter. So setting up a tarp is an essential skill.
Hammocks have a niche of their own in the camping community. Most people who grew up camping usually did it in a tent, so hammock camping presents a bit of a learning curve to many.
Why Learn?
Whether you make the switch or not, it’s worth learning the skills involved. These same skills can be applied to more than just hammock camping, especially the knots.
Whether lounging during the day or sleeping at night, hammocks are comfortable and convenient. However it does take a bit of getting used to when it comes to sleeping in one. A proper “hang” is also necessary for the best comfort. The more you practice the techniques involved the more comfortable you’ll be leaving the tent at home.
Honing your skills at home is not only a great past time, but it also gives you more time to enjoy nature when you do make it out. It takes the stress the whole ordeal. It’s also easy to get carried away with novelty gear but if you’re testing out your gear before you hit the trail, you’ll quickly find out what’s worth bringing.
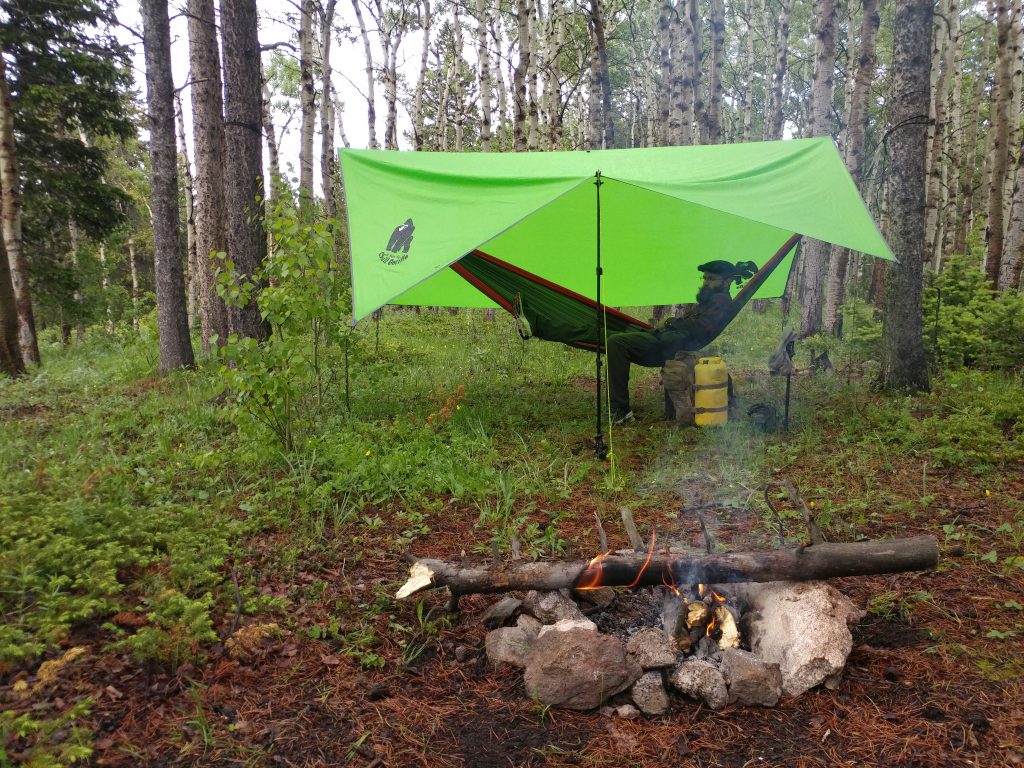
Making some morning coffee under the snowfall, Mmmm
Hammocks are a perfect bed at night, but they’re just as nice to have when the sun comes up. With a hammock setup there’s no need for a camp chair and without a floor underneath, you can have your camp kitchen next to you. You don’t even have to get out of bed to make your morning coffee.
Who wants to sleep on a floor?
Don’t get me wrong I’ve slept on my fair share of floors, but there’s a number of issues that come with it. If you manage to find a nice level, well drained, ideal spot big enough to pitch your tent you’ll then have to deal with critters, dirt, moisture, and debri (especially when it’s sharp).
A good way to avoid ants in your pants is getting off the floor. Ticks and their cousin the spider and scorpion are another great example of why to do this. Hammocks with bugnets are easy to come by and well worth it, while still being a lighter weight option than most tents.
Dirt doesn’t really bother me when it’s on the ground. What does bother me is getting dirt out of my tent before I pack it up.
Moisture goes hand in hand with dirt. It’s hard not to track in water, usually in the form of mud. If you get your tarp up before it rains, you have a nice dry floor that effectively absorbs any mud or moisture on your shoes. But then again, who really cares how wet or clean the floor is when your not sleeping on it or bringing it back home with you.